What Is a Lightning Network Node? ⚡

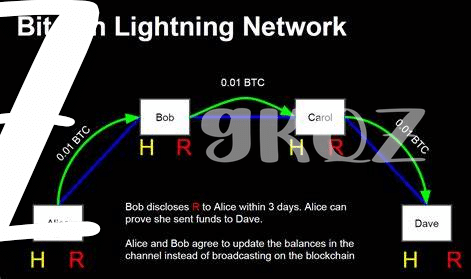
Imagine you’re at a bustling outdoor market, each stall a hub of activity. In much the same way, a node is like one of those lively market stalls within the bustling world of Bitcoin. However, this node operates on the Lightning Network, a special layer that sits on top of Bitcoin’s blockchain. Its main job? To make transactions faster and cheaper. Picture the Lightning Network as a speedy express lane, allowing customers (transactions) to skip the long lines (delays and high fees of the traditional Bitcoin network) and get their business done quickly.
Now, consider the role of the stallkeeper (that’s you, if you decide to run a node). Your stall (node) helps to pass messages (transactions) along in this express lane swiftly. But it’s not just about speed. By setting up your stall, you’re adding another passage to this fast lane, making the network even more efficient for everyone. It’s a win-win: the network becomes more robust and capable, and in return, you earn a small fee for the transactions that pass through your stall. Here’s a simple table to break it down:
| Term | Description |
|---|---|
| Lightning Network | A layer on top of Bitcoin’s blockchain for fast and cheap transactions. |
| Node | A connection point that passes transactions across the Lightning Network. |
| Blockchain | The technology underlying Bitcoin, recording all transactions. |
By jumping into this role, you’re not just participating in a financial revolution; you’re actively helping to build and sustain a system designed for the next chapter of digital currency.
Essential Equipment and Software You Need 🖥️
Venturing into the world of Lightning Networks is akin to setting up your very own digital frontier outpost. You need the right tools to ensure your node is not just operational but thriving. Picture this: a powerful computer that acts as your fortress, dedicated specifically to this task. It doesn’t have to be the latest model, but it needs to be robust enough to handle continuous operation. The heart of your setup is the software that powers the Lightning Network node. There are several options available, each with its unique features and requirements. Selection is key, as this software will be your guide and gatekeeper in the digital landscape of decentralized payments. For more insights into the broader implications and opportunities of these technologies, consider exploring https://wikicrypto.news/beyond-bitcoin-diverse-applications-of-public-ledger-technology.
Beyond the hardware and software, your node needs an uninterrupted internet connection. Think of it as the lifeblood that keeps your node connected to the Lightning Network, allowing it to communicate, transact, and maintain its presence. Additionally, a fair amount of storage space is a must. This is your ledger, your record book, where transactions and agreements are stored. It’s not just about having space; it’s about securing history. Pair this with a reliable power supply, and perhaps even a backup, to shield your node from the unexpected. Together, these elements form the backbone of your Lightning Network node, setting the stage for a deeper dive into the world of digital finance and beyond.
Setting up Your Node: the Basics 🛠️

Imagine you’ve just received a brand-new puzzle; assembling your Lightning Network node is somewhat similar, but digital and a bit more exciting. First up, you’ll need a reliable computer 🖥️ – think of it as your puzzle board where all pieces come together. Now, to the software part: downloading the Lightning software is like picking out the corner pieces; it sets the groundwork for everything else. The setup process? It’s as simple as following your puzzle box’s picture. You’ll carefully follow the software’s instructions, step by step, connecting your computer to this innovative network. It’s a bit like connecting puzzle pieces; each one snaps into place with a satisfying click. As you progress, you’re not just building; you’re becoming part of a global community, contributing to a faster and cheaper way of sending money around the world 🌍. Remember, each step is important – no skipping ahead, as every piece ensures your node is strong, secure, and ready to join this digital puzzle masterpiece.
Securing Your Node Against Threats 🔒

Imagine you’ve just built your own digital fortress. It’s sleek, efficient, and ready to join the digital world. But like any fortress, without proper locks and guards, it’s vulnerable to invaders. This is where securing your lightning network node comes into play. It’s not just about making sure it runs; it’s about making sure it stays yours. Strong passwords are your first line of defense, creating a barrier only you can cross. Then, enabling two-factor authentication adds an extra layer, like a moat around your castle. It’s these steps that keep your node safe from those trying to sneak in.
Furthermore, regularly updating your software is like reinforcing your fortress’s walls. As the digital landscape evolves, so do the strategies of those looking to exploit weaknesses. Staying updated means you’re always one step ahead. For more insights on keeping your digital fortress impenetrable, including more about bitcoin and payment channels suggestions, consider diving deeper into the subject. This knowledge not only secures your node but ensures you’re an empowered participant in the network, ready to make transactions safely and efficiently. Remember, in the digital realm, your security is your strongest asset, so fortify it well.
Testing Your Node: Ensuring It Works 🧪
Once your lightning network node is up and running, it’s time to put it to the test. Think of this as a practice run to make sure everything works as it should. The first step is conducting a transaction within the network. It’s a bit like sending a text message to a friend to see if it goes through. You start small, maybe sending a tiny amount of Bitcoin to another node. This is the fun part where you get to see your node in action. It’s like watching your little digital creation take its first steps.
During this phase, it’s crucial to monitor how your node performs. Here’s a simple checklist to help keep track:
| Task | Details | Status |
|---|---|---|
| Send a test transaction | Send a small amount of Bitcoin to another node | ✅ |
| Receive a test transaction | Request a small amount of Bitcoin from another node | ✅ |
| Check network connectivity | Ensure your node can communicate with others without issues | ✅ |
| Monitor node performance | Observe if there are any lags or failures | ❌ |
Remember, the goal here is not just to see your node in action but also to catch any potential issues early. It’s a bit like proofreading an important email before hitting send – double-checking everything is in order before you dive into the busy world of Bitcoin transactions.
Joining the Network and Making Transactions 💸

Now that your node is all set up and secure, it’s like you’ve just opened a new store in the digital world, and it’s time to welcome customers and start trading. Imagine your node as a small but mighty shop on the bustling streets of the internet ⚡. First, you’ll want to connect with other shops – in this context, other nodes. This connection is crucial because it’s how you become a part of this energetic community. You do this by creating channels, which are like bridges allowing you and others to send and receive digital currency swiftly and efficiently 🌉. Now, it’s all about making transactions. Think of it as handing over digital cash across these bridges. You want this process to be as smooth as handing cash to a friend. For those keen on diving deeper into the world of digital currency and making the most out of their node, looking into bitcoin and public ledgers can be a game-changer. Not only do you get to participate in this revolutionary network, but you also have the chance to earn from it, all while contributing to a faster, more efficient way of making transactions across the globe 💸.
